Seo Đà Nẵng
Hiển thị các bài đăng có nhãn CorelDraw Tutorial. Hiển thị tất cả bài đăng

The Most Fastest way Creating Android logo on coreldraw

Two days a go i ask two of my student to create android logo on coreldraw, and one of the student creating android logo in beautiful technic at least for boys 10age old. It mean he realy understand how to use shape tool and trim.


create android logo on coreldraw

-->
1. Create a rectangle

Create a rectangle using rectangle tool or press F6, and follow the dimension as the image shown below


2. Make the Rounded Corner

How to make the rounded corner ? 
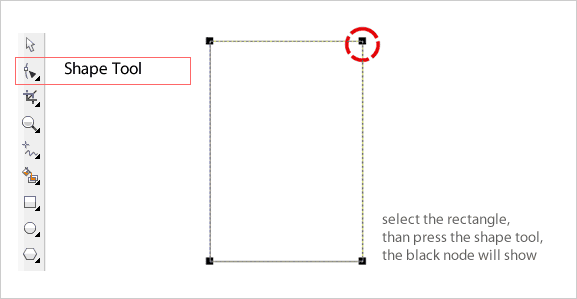
Use the shape tool, and drag down or drag aside one of the node (on corner) on that rectangle, see the image below :

Using Shape Tool


Rounded Part
Drag the black node down or aside.
See the value on property bar (red circle sign), make sure the Lock Button (green sign) is pressed.
The blue Circle sign, this function only available on CorelDraw X5 or higher, but that doesn't matter for you if using below X5 version.
**Then Copy this object., i will tell on the next step.**


Now, still using Shape tool
Edit only the bottom right and left node, and make sure to unlock the value (green circle sign)
See carefully to value


Easy right ? Come on.... 
**Now Paste the object that you copied earlier**
then drag to next of th first object


Then resize the new object , see the size value


Then convert to curve,
Two way : (select the object first)
1. Go to Arrange and find convert  to curves, or
2. Press Ctrl+q on keyboard
3. Find this button on property bar


Now, Select the bottom right and left node, then drag down


it should be like this :


Now we have a hand ;) Copy that hand and lets make that cute robot to normal robot with two hand ;)
and make sure have same space between the body.


Go on, you know the rest, he need foot !;)
Copy again and make posisition look like this


3. WELD

Select the body and foot only then press weld button


4. TRIM

Separate the head off the body ;) 


4.1 Create a rectangle crossing the head
4.2 Select (becareful) First the long rectangle, than select the body. It's like a cutter which became the cutter that should select first . Than find Trim button, press it.
4.3 Delete that long rectangle

Now creating the antenna


1. Copy one hand and resize into small cute shape
2. Make that new shape long, like you did for the hand at first time, scroll up, guys.
3. Rotate 

Now do WELD thing again to make head and antenna blended


what that left behind ?? Eyes ? Come on... you can make that.


-->

Corel draw tutorial creating Shield

Coreldraw Tutorial


CREATING SHIELD ON COREL DRAW


Step 1 - Creating Basic Shape
Create hexagons, exactly as shown below using the freehand tool
Next is customize the hexagons
Step 2 - Curved The Hexagons
A. Click on everyside, (one by one) with shape tool
B. Then use "convert line to curve" tool, and curved exactly as shown below 

Do to all side, and the result will be like the image below,.... easy, right?
Step 3 - Coloring The Hexagons
A little bit difficult, but still easy ... as to create a shiny metal effect.
If you look at the picture below, this is the "Fountain Fill" dialog. You can see that I marked with a red oval, it is an important part in the coloring to make it look like shiny metal
A. Custom B. Curent C. Position D. Triangle Color Parameter.

Every Triangle has 2 value : Position and Current Color
You can see we have 5 Triangle, and with start point is black, and end point is white. So, we start after the black start point. To Create Triangle parameter, Just double click on the dotted line ....

Now click the Triangle one by one :
First Triangle : Position 26%, Current Color : 70%black
Second Triangle : Position 40%, Current Color : 40%black
Third Triangle : Position 52%, Current Color : 20%black
Fourth Triangle : Position 72%, Current Color : White
FifthTriangle : Position 90%, Current Color : 20%black
Easy, Right..... I'm sure you can follow. And the result would be like this :

Woow, i'm sorry guys, i didnt mention the size since beginning ;).... Let say It had :
Width : 5cm, Height : 6cm

Step 4 - Contouring
Click the Basic hexagons, on property bar >> Effects >> Countour, or just press Ctrl+F9
Set the offset value : 0.3Cm, Step : 1, Click Apply. (see image below)

You see now we have two layer of hexagons, Break it Appart, 
Arrange >> Break Contour Group Appar Ctrl+K. 
Fill that new layer with YELLOW (temporary)............(see image below)
Now, Click the Yellow hexagon, and contour it ... follow the contour parameter as shown below
Arrange >> Break Contour Group Appar Ctrl+K. like we do it on previous step.
Step 5 - Trim
After you break it appart, first click the Black solid layer, Hold the SHIFT on your keyboard, click the Yellow layer, then press Trim Button on menu bar..(see image below)
Step 6 - Coloring Inner Layer
If you drag out the yellow layer, you will see that the yellow layer seem have no fill or just big outline, actualy that is Solid Fill Area. (see image below)

Lets fill that layer with  " Fountain Fill " , like we did before on Step 3, There will be triangle, but this time we make it more simple, just with Two triangle parameter.(see image below)

Now click the Triangle one by one :
First Triangle : Position 28%, Current Color : 60%black
Second Triangle : Position 77%, Current Color : 10%black 
The result would be like this (see image below)


No drag it back to the center, and it would be like this (see image below)
Step 7 -Main Shield Motif Color
Create  TWO rectangle 
And each have Width : 0.7cm Heght : 6cm.
Then Draw straight line with 5cm long. 
Put one of the rectangle on the left side of the line, do you know how to do that ? 
Click One of rectangle, Hold "Shift" on your keyboard, select the line, then press "L", 
do that to another rectangle , but this time on right side of the line.(see image below)

Now , Select that two rectangle. Go to menu bar Effects >> Blend,.... Follow all the parameter on Blend Dialogue Box, dont forget to click Apply (see image below)

Delete the line, Go to Menu bar Arrange>> Break Blend Group Appart.
Click the middle rectangle, UNGROUP it, Select all rectangle GROUP it.
Then Rotate it to 135 Degrees  (see image below)

And fill it with Fountain Fill , Here we determine the direction of the light and how much light was shining armor. With more first color darkens, it means that the rising was close and very strong.  (see image below)

The Result would be like this...(see image below)

What we have so far
Step 8 - Container
Select orange rectangle, go to menu bar Effects >> Powerclip >> Place Insde Container,


pointed that black arrow to inner layer of the shield/hexagons,
The Result would be like this...(see image below)


Step 9 - The flashes of light
Create object like (A) on image below, then use shape tool to modify, do exactly like the example (B)
(see image below)

Fill it with WHITE color and no outline, then put it above the shield.....

Select that white thing, Use interactive Transparancy Tool, choose Uniform..... just follow the parameter that shown on image below.


That's it Guys!. Hope this tuts can inspiring you to create great vector, and i hope you learn something from this...... see you in next Corel Draw Tutorial




Corel draw tutorial, create twitter bird

CREATING TWITTER BIRD ON COREL DRAW


Creating Head
Draw a line, using freehand tool (F5) make it 35degree last node, 
Use Shape Tool , you will see red line and small ribbon, drag everyside of the ribbon exactly like the image number 2

Then, make that line curve like this :
1. Using shape tool  
2. Click on the middle of the line 
3. Convert line to curve

Creating Tail
connect the last curve, with a new line.... not too straight, tilt it about 5 degrees

1. Using shape tool  
2. Click on the middle of that new line 
3. Convert line to curve

Body
Connect the first node to the last node, so that curve turn to "close curve" , what is "close curve" ? it mean that you can fill it with color, effects and so many thing. Or just press Auto-Close Curve. You see that the last node with the first node connected and automatic closed. 

Now, create the curve for the body
1. Using shape tool  
2. Click on the middle of that new line 
3. Convert line to curve


Body Blue
As we know all, twitter has a distinctive color, blue. If the bird is brown, it's not twitter, it is BEKO-BEKO ! Hahahahaha. If you live in the city of Bogor, must know what it is  BEKO-BEKO...;)
Use interactive fill  >> 
Choose Linear >>
(RGB) First color "SkyBlue", Second color " "Turqois" >>
Let the Fountain Fill Midpoint as default 50% >>
Fountain Fill Angle 140Degrees >>
Edge Pad 39%

The Eye
This bird has cute eyes , blue, black and white...;) 
First, we create the Outer Layer of the Eye
Create a circle, fill color using interactive , as you see the image below,... follow all the linear fill parameter.
Lets we call it "Blue Eyes"

Now Create the second layer, Follow the step on the image below :
1. Create Big circle >> Fill it with black color
2. Create Medium and small circle, foloow the position as image below, fill it with white color.
3. Picture say thousand words , right? Hahaha... just take a look the image below, will you ?
4. GROUP IT.
Let say this "Black Eyes"

Now put the Black Eyes above the Blue Eyes
Make sure the black eyes is a group objects.
1. Select the black eyes, Hold "Shift" on keyboards
2. Select the blue eyes
3. Ctrl+A, it will show the pop up dialogue "Align and Distribute"
4. Check the vertical and horizontal "CENTER"
Or After you select the objects, just pres E then C


After the eyes finished, put that on the bird head......
Ok, Let see what we have so far.

The Hairs
This bird only have 2 hairs..... ;)
Do i have to write on this section..... come on,... just follow the instruction as the image below, it just repeated from previous section. if you cant follow the step, Go Up...;)

Hair Color
Follow the Linear Value/Parameter, as show on this image below, Duplicated the hair, and put it above the bird head

The MOUTH
First layer.
Create 4 side object like stealth ship , curve every side by using shape tool
Color it
Now we create the second layer of the bird mouth..
Countour >> Inside >> and the value is depend on first layer size., the most important is how you describe the deep of the bird mouth open
- Go to property bar >>Arrange >> Break Contour Group Appart (Ctrl+K)
- Then slide a bit result of the contour, close to the right, look like this :
Creating cavity of the throat,
make a circle, put it above the black mouth, Select the circle first, Hold "shift" on your keyboard, select the black mouth, then press "intersect".
The result of intersect, fill it with dark brown.

Then we creat tongue, so that bird can tweeeeeeeeeeet.

see the full mouth
what we have so far is :

The Wings
Most easy part is the wings

Color it using interactive fill then  follow all the parameter on linear value
What we have so far ? She has wing now ! 

That's it Folk, Happy Nice Weekends !
Related Articles: